Human Design Variables - a Case Study
Part 1

For the past few weeks, I’ve been re-visiting Ra’s lessons on Rave Psychology, which, in combination with the Primary Health System (PHS), deals with variables in Human Design. I’m going to split this discussion into two posts, the first being a more technical explanation of variables, so we’re on the same page for a case study I want to share on working with the deeper bodygraph architecture in a way that supports in fulfilling Profile or purpose. On the Design side (PHS), your variables - those arrows shown below - correspond to the diet regimen and proper environment your vehicle/form/body needs to be correct:
And the arrows on the right give us an intrinsic motivation and correct perspective for the Personality (Rave Psychology):

The arrows simply tell you whether each of your variables (diet, environment, motivation and view) is Left/Strategic or Right/Receptive, but to find what your specific variables are, I recommend creating an account with Genetic Matrix because it’s free…!

After you generate your bodygraph, use the third drop-down menu (shown above) to switch from Quantum to Design* - this shows only your red activations - and gives you diet (called Determination) and Environment. Then you can choose Personality* from the same menu - which shows only black activations - to see your Motivation and View.
*Don’t be concerned if/when your type changes on the Design and/or Personality side of things. Your bodygraph is technically a “Quantum” of the red/unconscious and black/conscious activations. I’m a Design Splenic Projector and Personality Self-Projected Projector that, taken together, create a Splenic Manifestor when my unconscious 51 and conscious 25 activate my Ego motor to my Throat.
But I digress… Cognition/Environment/Motivation/View - or Variables - are the same thing as “Color” in Human Design. Like your Profile (e.g. 1/3, 2/4, 5/1 etc.), Color (each Variable) will be a certain number from 1-6 that’s associated with the six lines of the i’Ching hexagram. There’s an important caveat here relative to correct birth time. The “Rave Mandala” that is used to create a bodygraph is the wheel of the zodiac divided into 64 Gates:
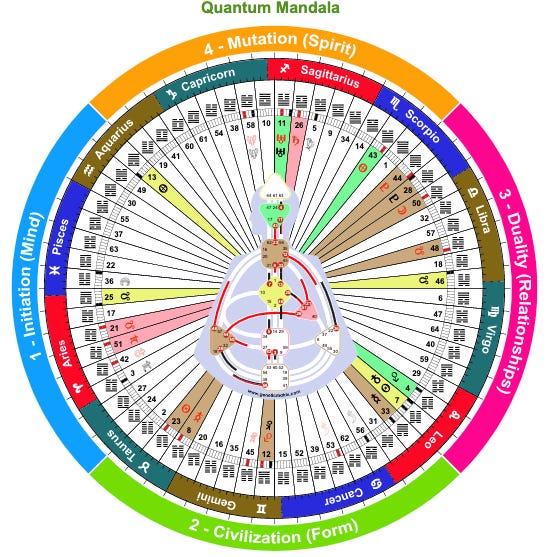
Here’s my mandala from Genetic Matrix to show how each astrological sign is split up into 5 or 6 gates, with some signs sharing certain gates. To get Profile Lines, each gate is then divided into the six lines of the hexagram:

The different combinations of six either solid or broken lines is called the hexagram stack. The degrees of a sign are divided up into gates, then within a gate we have a further subdivision into the six Lines. I’m a 6/2 profile, which means my Personality Sun/Earth are in the 6th line of that gate, and my Design Sun/Earth are in the 2nd (you can see the black/red notches in one of six subdivisions within the gate in the mandala above). From there, if you subdivide each Line six more times you get Colors, subdivide Color 6 times and you get the Tones.
So, my point about accurate birth time: at the Tonal level - which determines whether your variable is Active/Left/Strategic (Tones 1-3) or Passive/Right/Receptive (Tones 4-6) - things can change within a matter of minutes. Within an hour or less, depending, Color can change giving you a completely different variable altogether - like Desire Motivation instead of Hope. The substructure - the Color and even more so the Tone (leftness or rightness) - of the Line represent very, very small fractions of the degrees of the zodiac.
If your recorded birth time ends in a 0 or 5, such as 5:15 or 1:00, we would consider it risky to look beyond your Profile because trying to operate from the wrong variables (as it is *possible* the hospital staff rounded/estimated time of birth) is simply not going to be correct. The same goes especially for those who don’t know their birth time. As much as it breaks my heart to express, unless you’re relatively certain of your birth time, I would not experiment with variables because the results could be damaging to your health. Stick to Strategy and Authority which trumps any experimentation with Variable at the end of the day.
I hope you’re still hanging in there with all this technical-speak…! In my next post I want to share a case study of sorts from my own experiment in understanding and implementing my correct View and Motivation. I should note that Ra was quite adamant that a person should not try to work with the Personality variables (Motivation and View) until they’ve corrected their Design Variables (Determination or diet and Environment).
Before discovering Human Design, towards the end of my Saturn Return, it was as if my vehicle simply brought me to the mountains (my correct environment). Since learning about my Indirect Light determination, I’ve implemented intermittent fasting during the day and keeping the bulk of my consumption to non-daylight hours. So, I feel comfortable in beginning to experiment with my Personality-side variables because my vehicle is well supported. I can’t be properly motivated or see what I’m supposed to see if I’m not in the right place with the right state of mind to do so.
When it comes to Design-side variables (Determination/Environment), there is no “transference.” When you operate correctly - that is, you are in the right environment and have the necessary consumption habits (of food and information) - things are fixed in place to support your in living out your Profile or purpose. But on the Personality side, your View and Motivation are always going to “transfer” to the View/Motivation that is 3 colors away.
The 6 Motivations and their transferred Motivations:
Fear - transfers to Need
Hope - transfers to Guilt
Desire - transfers to Innocence
Need - transfers to Fear
Guilt - transfers to Hope
Innocence - transfers to Desire
The 6 Perspectives and their transferred Perspective:
Survival - transfers to Want
Possibility - transfers to Probability
Power - transfers to Personal
Want - transfers to Survival
Probability - transfers to Possibility
Personal - transfers to Power
In my personal example, my Guilt motivation (about fixing problems) is going to naturally default to Hope (waiting around for things to resolve on their own). Unless I make a concerted effort to put my mind to work noticing my transference so I can correct it - relying still and always on my Authority to make decisions - I’m bound to suffer. Likewise with my Possibility View (not caught up with any one thing, unconcerned with results), I’m going to revert to looking at Probability (concerned with what’s “likely” to happen). You may or may not have noticed that I have a 5th line Motivation that transfers to the 2nd, but a 2nd line View that transfers to the 5th. There is an inherent paradox of these diametrically opposed trajectories within my Personality variables. And I haven’t even brought up the Left/Right binary that Tone creates within each variable/Color to further complicate the issue.
This is a very advanced topic in Human Designs because there are so many sophisticated movings parts and pieces. On it’s own, the Motivation of Guilt to fix problems looks very different from a passive vs. active stance. When you add in my Possibility View and my 6/2 Profile, we start to see how easily the straight-forward, “you’re here to fix problems,” gets complicated. Stay tuned for my next post where I attempt to explore how to piece this together and apply it in a real-life situation. Wish me luck…!
Until next time,
Leslie